Saturday, September 26, 2009

Baked Pumpkin Kueh

Hehe.. After "Missing In Action" for a long long while, I'm finally back!

Nah, actually I wasn't away.. Just that the laziness in me refrained me from baking and posting.. Finally.. Now I'm left with the last sem to go before graduating.. So, officially I've cleared the last exam in poly! Double yea!

Anyway.. I baked a Pumpkin Kueh some time back.. (Long time back actually).

I forgot where I got this recipe from.. So if anyone of you out there know, please let me know, K?

Baked Pumpkin Kueh

Ingredients
  • 500g pumpkin (cut into small pieces)
  • 300g water
  • 160g plain flour/ Cake flour
  • 120g sugar (Reduced to 80g)
  • 175g coconut milk (Replaced with milk)
  • 1/4 tsp salt
  • 2 eggs, beaten

Methods

  1. Preheat oven to 175C.
  2. Lined and grease a 7 inch square tin with butter and set aside.
  3. Cook pumpkin in water till soft.
  4. Remove pumpkin, mashed and set aside to cool.
  5. Using a hand whisk, mix flour, sugar, salt, coconut milk, and mashed pumpkin together till smooth.
  6. Add in eggs and mix till well combined.
  7. Pour batter into prepared tin and bake for 30mins - 40mins.
  8. Remove kueh and set aside to cool.


Although no doubt that the cake is edible... But personally I don't really like the taste of the cake.. I think I still like my pumpkin kueh to be savoury, something just like Yam cake??

Anyway, personally I find that the kueh has this flour smell.. Or is it that the pumpkin that I used is not fragrant.. I doubt I'll attempt this recipe again.. but still it's a good experience!

Oh, I've realised that kueh tends to be quite soft upon removing it from the oven, at first I was rather upset thinking that I've failed, but after a hour or so when the kueh cooled down, it hardens a little, and the texture is pretty nice! =)



Wednesday, July 8, 2009

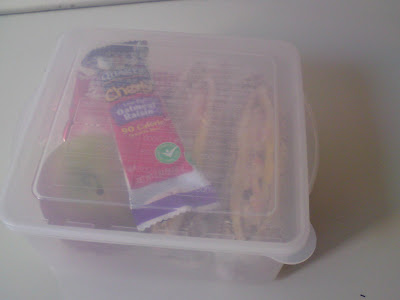
Bento #5

Today marks the 3rd day of Common test.. Really exhaust myself greatly from all the muggings..

Anyway, prepared a Bento for Mr B.. He's having he Basic Theory Test (after much nudgings) in the evening time, and knowing him inside out, I'm quite certain that he will be hungry by teatime, and thus, the purpose of this bento!

A relatively easy bento that I took 20 minutes to prepare (including the thawing and cooling time).

I make sure I pack everything right up to the brim as B has a "healthier than normal" appetite.. Keke..

I made a Egg prawn sandwich (B likes his prawns), squeezed some salad cream (else it'll be too dry) and top with some sliced onions. (wanted to include some cheese, but ran out of it)

Also added an apple for fibre, a packet of hello panda chocolate biscuit, and a Quaker Oatmeal rasin cereal bar, just to make sure that it can fill him up to 50% satiety.

Basically, I just make do with the things I've on hand to assemble this bento.

Hope he enjoyed his meal, and I'm sure he'll pass his BTT!!

Saturday, July 4, 2009

Boo-hoo.. Sob sobs..

Raah!! Was so so so unlucky recently!.. Or rather 2 weeks ago..

I dropped my phone into the public toilet bowl.. Gosh.. Even now when I ponder about it, I seriously thinks that it's just so so so dramatic..

But anyway, one consolation is that the "oh-so-unlucky" phone is 2 year old.. I think if I drop a brand new phone into the toilet bowl, I'll seriously cry!

Anyway, I've got myself a new phone, with a 5 megapixel camera, guess that promises better quality pictures of my bakes.. keke..

It's a Sony Ericsson C902 Cybershot phone (Seems like Blogger can't upload any pics)


2nd issue for me to cry over is that my hand held cake mixer officially R.I.P

Sigh, seems like at the moment I can only whip up some stir-mix-bake stuffs... =(

Saturday, June 27, 2009

Sweet Corn Chiffon Cake

Hee.. Baked something else today.. I'm back to the chiffon craze..


Yes, I baked a sweet corn chiffon cake today.. Easy peasy.. I got it done within 1.15 hr.. Not a time consuming bake.


The most important step in chiffon making.. Whipping of egg whites to stiff peaks.. Looks like whipped cream uh?


Anyway, one simple way to test if it's the stiff stage, simply overturn the whole bowl, and the white will not fall off..


Next, just stiff in some whites to lighten the yolk mixture, then subsequently fold in all of the whites.


End Result.... One word to sum it all up.... DISAPPOINTING...


So so disappointed with the appearance, as well as myself.. I was so impatient, I removed the cake after 20mins of cooling (Usually takes 1 hr), and I was chatting away while doing this, next thing i know, I drop the whole pan on the countertop, and flop the whole cake out..


Causing big wholes here and there.. Geeshh!!


Nevertheless, I still like this cake (tho it's ugly). Simply because it taste so heavenly!! I like the fragrance of the coconut, and the bites from the sweet corn.. Lovely!


One thing to rejoice about is that this time round, the browning is more even!


Sharing with you the recipe, adapted from Peng's Kitchen

Sweet Corn Chiffon Cake

Ingredients
  • 6 egg yolks
  • 250g creamy sweet corn
  • 1/2 tsp vanilla essence
  • 60ml corn oil
  • 100g castor sugar
  • 120g plain flour (I use a mixture of 55g cake flour, 65g self raising flour)
  • 50g coconut powder
  • 6 egg whites
  • 1/2 tsp cream of tartar

Methods

  1. Whisk egg yolk with 30g of sugar till pale and creamy.
  2. Stir in oil, vanilla essence and sweet corn. Mix till well blended.
  3. Stir in the sifted flour, and coconut powder and mix till well combined.
  4. Beat egg whites with cream of tartar till frothy, then gradually beat in the remaining 70g sugar and beat till stiff peaks.
  5. Gently fold in the whites to the yolk mixture.
  6. Pour the batter into ungreased chiffon pan, and bake at 180C for 35min-45min.

Amendments made:

- Substitute part of the flour with self-raising flour. And I omited the baking powder.
- Add in another 4 tbsp of canned sweet corn.
- Mistaken 60ml of oil as 40ml, so in the end I only added in 40ml.

Thursday, June 25, 2009

Lemon Yoghurt Cranberries Chiffon Cake

Yoghurt Lemon Cranberries Chiffon Cake.. Woah, what a long name! Hmm.. Guess in short, I'll name it, "The Celebratory Cake".

You guys might be thinking, why celebratory cake??

It's because, "thanks" to the outbreak of H1N1, my school (Nanyang Polytechnic) gets an extension of another week of holiday, which means I've an additional week to mug for my test-s! So that calls for the celebratory cake!

Hmm.. Seems like recently I've been clearing my "to-bake-list" (which is good!).

Anyway, even before I've a taste of this chiffon cake, I kind of like fall in love with the name, imagin the combination of Yoghurt + Lemon + Cranberries, sounds so refreshing right?! Ok, at least for me, I love anything that's fruity, and FLUFFY. Yes, FLUFFY is another distinct characteristic of chiffon cakes.

Woppes, and I almost forgot to mention that, this cake is quite moist as well! Which I think is good, imagin you've to stuff down a piece of cake that's so dry that you almost choke.. Not a good experience, I suppose.


Did not manage to get a nice even brown surface.. Sigh, maybe my chiffon pan is not season enough..

Maybe it's an indication that I should bake more often? Hiak Hiak Hiak!

I'm thankful that the cranberries floats around instead of sinking to the bottom.


Looks like a sponge! Reasonable height as well..

Hmm.. I think I got the trick to chiffon making.. *Happy Happy* Beating of whites... Folding.. etc etc...

Sharing with you the recipe, obtained from All That Matters, Thanks Rei!

Lemon Yoghurt Cranberries Chiffon Cakes

Ingredients

(A)
4 egg yolks
40g castor sugar
1/4 tsp salt (Added a pinch only)
40g cornoil
120g plain yoghurt
2 tbsp lemon juice
zest of 1 lemon
80g dried cranberries (Used only 65g)- Toss with 1 tsp cake flour

(B)
120g cake flour (I use a 130g mixture of top flour, and cake flour)
1/2 tbsp baking powder

(C)
5 egg whites (I used 6)
50g castor sugar
1/2 tsp cream of tartar

Methods

  1. Whisk egg yolks with 40g castor sugar till creamy.
  2. Mix in lemon zest, lemon juice, salt and oil. Mix till well blended.
  3. Whisk in sifted flour, and flour coated cranberries- (A trick to prevent cranberries from sinking)
  4. Beat egg whites and cream of tartar till frothy, then gradually add in sugar and beat till stiff peaks.
  5. Stir in 2 tbsp of egg whites to lighten the yolk mixture.
  6. In 3 batches, fold in the egg whites till well combined.
  7. Pour mixture into chiffon pan and bake at 175C for 10minutes. Then lower the temperature to 160C for 20 minutes. Then lastly, 150C for 10minutes.
  8. Remove cake from oven and overturn immediately till cooled.

By the way, this is the very very 1st time my chiffon cake surface have no cracks!!

This recipe is so worth to keep! And I'm sure I'll bake this over and over again!

Sunday, June 21, 2009

Japanese Cottonsoft Cheesecake!

Japanese Cottonsoft Cheesecake has been on my "To-bake-list" for the LONGEST TIME ever..!

Yesterday eldest sister had a buffet party for her friends, so I contributed this cake. I've always wanted to try out baked cheesecakes, but just that I'm plain lazy to get the ball rolling, and since she's having a function, I jumped at the chance, taking this as an opportunity to practice some baking!

Those people that tried the cake loves it! (except brother-in-law, who loves heavy, dense kind of cheesecake). Well, I love this cake too, it's not rich like NY cheesecakes, and it's cotton-y spongy soft! And my 2nd sis's bf actually commented that it tasted like Breadtalk's, and that really makes my day!!


See! The cake rise and brown evenly!


The end product, a nice and soft cheesecake!


I unlock the springform pan while the cake is still hot, and alas! Cause a big ugly crack at the side.. =(

The interior of the cake. I did not use a sharp knife, that's why the cut is so ugly.


And lastly, I'm very happy with the height of the cake! Rise so nicely!

Recipe from Kitchen Capers Forum. Variations made by me are highlighted in RED

Japanese Cottonsoft Cheesecake

Ingredients
  • 250g cream cheese
  • 50g butter
  • 100ml milk
  • 60g superfine flour (I use Top flour)
  • 20g corn flour
  • 6 egg yolks
  • 6 egg whites
  • 1 tbsp lemon juice
  • 140g caster sugar (I use 120g)
  • 1/4 tsp cream of tartar
  • 2 tbsp lemon zest

Methods

  1. Using the double broiler, melt the butter, cream cheese, and milk together. Leave it to cool till room temperature.
  2. Using a ballon whisk, stir in the sifted flours (cornflour + Top flour) till well incorporated. Mix in the lemon juice, zest and egg yolks.
  3. In a dry and clean bowl, whisk egg whites with cream of tartar till frothy, then slowly add in caster sugar and beat till soft peaks.
  4. Gently whisk in egg whites (In 3 batches) into the cheese mixture, till no visible streaks of egg white could be seen.
  5. Pour the batter into the lightly grease and lined cake pan and bake in a water bath at 160C for 70mins.
  6. Chill in refridgerator before serving.


Wednesday, June 17, 2009

Blackcurrent Cheese Tarts

Gosh! Couldn't believe it that it's been almost 2 months since my last post.. Hmm.. I guess no one reads my blog anymore, thinking that I've either gave up blogging, or baking.. Sheesh..

But nah, I'm still into my fav hobby (ie: baking).. Just that there's been lots of school work to complete, and tests to mug for.. And of course, distractions like facebook games, which can be quite addictive!

Nevertheless, I did bake something, sometime back, just that I did not have the time and effort to blog about it.

Blackcurrent Cheese Tarts! My favourite!

I got the recipe from Aunty Yochana's blog.


And finally I put the tart mould (ordered from Kitchen Capers sometime back) to a good use!


I'm just too ooo ooo generous with the blackcurrent filling, resulting in it sinking in.. Which I think that it's quite ugly... Keke..

Look at the flowy current filling..

My only complain for the tarts is that the vanilla extract I added in is too dark in colour, staining the cheese to a yellowish brown colour, yes, again, it's ugly!

It taste quite good, abeit that it's ugly.. =(

Sharing with you guys the recipe!

Blackcurrent Cheese Tarts

Ingredients

Pastry


  • 100g butter
  • 60g icing sugar
  • 30g beaten eggs
  • 200g plain flour
  • 1/8 tsp salt
  • 1/2 tsp vanilla essence

Cream cheese filling

  • 300g cream cheese
  • 80g icing sugar
  • 1 tsp lemon paste
  • 15g vanilla essence
  • 50g whipping cream
  • 25g cornflour (sieved)
  • 2 large eggs

Some blackcurrent jam as topping

Methods

  1. Cream butter, icing sugar till slightly creamy
  2. Add in beaten eggs, salt, and vanilla essence.
  3. Fold in flour and mix into a dough. Leave in the fridge for 20 mins.
  4. Press dough into tart mould and cut off excess dough.
  5. Bake the tart mould till half-baked and let it cool slightly.
  6. Cream cream cheese and icing sugar till creamy.
  7. Add in lemon paste and vanilla essence.
  8. Add in eggs one at a time , beating well after each addition.
  9. Add in whip cream and mix evenly
  10. Pour filling into half-baked tarts, scoop a little blueberry jam topping on top of filling and then use a skewer to swirl into a marble effect and bake in preheated oven at 180C for 10 to 15 mins. or till set.
  11. Leave to cool before serving.

I brought the tarts to school to share with my friends, and of course to get their comments.. Generally good, and thank so much guys for being so generous w the comments!

Monday, April 20, 2009

Well well.. Ought to do some explaination for the lack of postings recently..

It's not that I've alot of bakes to share, and have no time to post.. but rather, I didn't bake anything at all.. Aww.. So sad..

Reason being schools starting soon, and I've got to pack up my previous sem stuff, and pack my room etc.. So really have no time to indulge myself in baking.. keke

I promise, once I get everything settled and adjust myself to the schooling hours, then I'll attempt something!

Wednesday, April 15, 2009

Sweet Corn Konnyaku Jelly

As promised, shall update on the 2nd jelly I made for Little Megan's B'day.

It's Sweet Corn Konnyaku Jelly! Alright, maybe I'm a mountain tortise, it's my first time hearing/seeing/knowing konnyaku jelly + Sweet corn... Hmm Hmm.. Sounds interesting? and I bet it taste as good as it looks (from Aunty Yochana's Blog). So I decided on that.

And hey, I've got the same jelly moulds as Aunty Yochana! Keekee! I like the pure white-ish colour, with bits and pieces of yellow here and there.. Ain't it prettyyy??

Sharing with you the recipe for this Jelly:

SWEET CORN KONNYAKU JELLY

Ingredients
  • 15g Konnyaku Jelly Powder
  • 750mL water
  • 200mL coconut milk (Yes, please use this for the fragrance..)
  • 150g castor sugar (I use 100g)
  • 1 tin cream style sweet corn (I use Del Monte)

Methods

  1. Boil 750ml water.
  2. Put sugar and jelly powder into a mixing bowl and stir till evenly mixed.
  3. When water is about to boil, pour in the konnyaku jelly mixture and continue stirring till everything dissolves.
  4. Pour in coconut milk and corn, stir till everything is evenly mixed.
  5. Pour mixture into jelly mould and let it set.
  6. Chill before serving.

Well, in my previous post I mention that B actually dn't like this jelly (he prefers the mango one), but my Uncle (Megan's daddy) actually prefers the sweet corn one.. So I guess taste is very subjective.


But if you were to ask me, I'll say that I like both! Heheh!

Tuesday, April 14, 2009

Mango Konnyaku Jellies!

Heyy all!! Finally I've decided to come back after a long period MIA-ing.. Hehe..

Wonder if anyone out there still reading this boring bloggie of mine, since I've been quite inactive down here for a couple of weeks..

Tho I MIA-ed, but I still did a bit of kitchen work, making some simple snacks without the aftermath (Major pile up dirty equipments and dishes at the sink). Okie, I admit, I was feeling lazyy.. Hiak Hiak Hiak!!

So made some jolly jellies for my little cousin Megan's FIRST Birthday Bash! She's a real adorable baby, can expect plentiful facial expression from her! And best of all, she can suddenly give you a wide smile, and yes, it makes my day and I'll go "Ahh gooo gooo" over her.. Haha!

So that day there's a buffet party, and my contribution was Corn Konnyaku Jellies and Mango Konnyaku Jellies.

This is the only picture I've of the mango jellies. After dislodging the jellies from the moulds and arranging them nicely (I hope) on the serving ware, I realised that I was running late, so I quickly use B's HP camera to snap a photo before making my way down to the function room.

As you can see, the jellies is overloaded with Nata De Coco and pineapple slices.. B said he prefer this than the corn one.. Oh well well.. Then I guess it must be good then, cos FYI, B doesn't like mangos, and when he say this (made using mango juice) is good, then most likely it's good!

Sharing with you the recipe:

MANGO JELLIES

Ingredients
  • 950mL Mango Juice (I use marigold)
  • 1 packet Nata De Coco, Drained
  • 1 Can sliced pineapple in syrup, Cubed
  • 1 packet REDMAN konnyaku powder (10g)
  • 40g sugar

Methods

  1. Arrange the Nata De Coco and Pineapple cubes in the mould. Amount is up to individual preference.
  2. Combine the sugar and konnyaku jelly powder, stir well to mix.
  3. Pour mango juice into a pot, pour in (1) gradually, stir well to mix. (Medium-Low fire)
  4. Continue stirring till sugar dissolves and mixture boils.
  5. Spoon mixture into the jelly mould, use a toothpick to burst any visible bubble on the surface of the jelly.
  6. Leave the trays of jellies to cool before placing it in the refridgerator to chill.
  7. Serve Chilled. Enjoy!

Note:

  • I definitely suggest not to add in too much sugar as the fruit juice used is already sweetened, so 40g of sugar is sufficient.
  • Remember to dry the fruits well, if not it'll affect the "hardening process" of the jellies.

I'll share the recipe of the corn jelly in the next post.. I'm too tired to continue typing.. Keke!

GOod NighT!